

The enterprise of coding and computer programming is rarely (if ever), a linear process. Even after the stages of brainstorming and other planning, the actual activity of coding involves a lot of back and forth. You’ll change things as you get a clearer picture of the vision for your application.
To assist in the development process, a variety of version control management systems have arisen. These are also sometimes known as source control management systems. Some popular systems include Mercurial, Subversion, and CVS. The most popular version control system though, and the one we’ll be looking at in this post, is Git.
What is Version Control and Why Use It?
Git was first developed in 2005 by Linus Torvalds. Linus originally developed it to manage the source code for his popular open-source operating system, Linux. As numerous developers were contributing to the project, there needed to be a way to sync everyone to a master copy of the code. Additionally, there needed to be a way to merge in everyone’s code revisions, without there being a conflict.
The basic structure of a project using Git includes the project directory itself and all its files, as well as a .git file. A Git project is also known as a “repository”. The .git file keeps track of every “commit” to the project. Each time you make a significant change to a project one can “commit” these changes to the source code. Each commit is a time-stamped entry, which you can recall should you ever need to revert to an earlier version. Git takes this even further by allowing one to have multiple “branches” or versions of the same source code simultaneously. This allows for a specific revision of the code to mature before merging it into the “master” branch of the project.
Git employs the idea of distributed development. This means that there is a master copy of the source code residing somewhere (typically on a server). Every developer working on the project also has a local copy of the project on their machines. Developers will “pull” the latest changes from the master repository, and then “push” their changes to the master. Many different developers may be working on other parts of the same coding project.
Version control & Git require the skills of an experienced senior-level web developer. Sunlight Media in Los Angeles can assist with this type of expertise.
How To Use Git Command Line

For those familiar with working with the command line, this is arguably the ideal way of using Git. Before beginning to work as a developer however, it is best to understand web development and what you need to know about it.
While there exist a variety of GUI applications Git, the workflow of the system makes the most sense on the command line. You can pick up the basic commands relatively easily. You can find instructions on installing Git on the command line here.
Here are some of the most commonly used commands to get started using Git on the command line:
GUI
For those seeking a GUI version of Git, GitHub’s a free desktop application and Tower are good choices. They’re both available for Windows and macOS. Each allows access to the most basic functions of Git, without having to deal with a command-line interface.
Tips for Using Git More Effectively
With Git being at the heart of just about every software development project out there, it’s important to hone your skills to use it most effectively. While just using Git alone and committing your changes is better than no version control system at all, there are a variety of techniques and best practices that can make managing your source code versions far more painless. This blog post will share a couple of the best tips and practices for getting the most out of Git.
Start a New Branch for Every New Feature
One of the best practices you can get in the habit of is creating a new branch for every new feature. You should do this for any significant change, no matter how big or small. This makes it far easier to keep your master, working version of the project untouched. Once you’ve completed the new feature you can merge it into the master branch.
To make a new branch, you can use the git branch <BRANCHNAME> command, where <BRANCHNAME> is whatever you’d like to name the branch. git checkout <BRANCHNAME> will move onto a new branch. Alternatively, you can combine these two commands with git checkout -b <BRANCHNAME>. This will create the new branch and then move on to it in one command.
Once you’re on a new branch, all changes to the code are separate from the master branch. An added benefit to this is having some sort of psychological safety net to make any changes. If you mess something up or end up wanting to scrap the new feature altogether, this is simple to do. You can move back to the master branch with git checkout master. Then, delete the new branch with git branch -d <BRANCHNAME>.
Once you’re happy with a new branch and would like to merge it into the master, you can do so by first moving back to master. Then you can merge the branch via git merge <BRANCHNAME>.
Another command that will be useful when working with branches is the git branch. This will list all current branches. It’s perfectly normal to have multiple branches at the same time with different features. git branch will come in handy to reference the branches, switching between them as necessary.
Use gitk for a Visual Representation
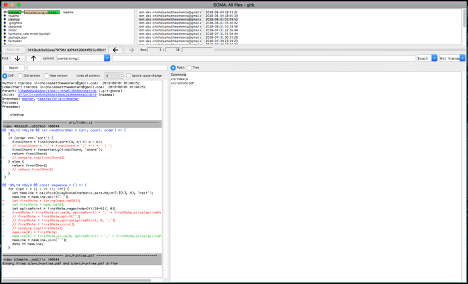
One often overlooked secret feature of git is gitk. This is a built-in GUI application that will visually show a list of all commits, their changes, and more. Sharing some characteristics with the UI of GitHub, gitk makes it easy to visually see your project.
gitk should come pre-installed with git. To launch it, simply type the gitk command in your terminal. If for some reason the command is not found, updating git should typically fix the problem. To do so on macOS, you can update git via Homebrew:
Run brew update to update Homebrew.
brew install git will then update git to the latest version.
After git has finished updating, run-type -a git. This command should show the path of git as /usr/local/bin/git. If it does not for some reason, you can fix this via brew doctor.
Using GitHub for Social Coding
What is GitHub?
GitHub is essentially a web-based version of the Git system, tailored for community and social interaction. GitHub allows you to host an unlimited amount of projects for free. Premium plans allow for private repos — useful for companies and enterprise applications. Users can have their featured projects displayed on their profile, as well as a chart showing their contribution history. Contributions to a user’s projects as well as open-source contributions will get represented on the chart.
This is an excellent way for developers to publish their work, serving as a portfolio of sorts. Anyone can see the source code and other assets for the entire project. Similar to social media sites, users can follow other users, see what projects are getting “starred”, and more. More importantly, most open-source projects welcome and encourage contributions from anyone.
Using Gists
One handy feature of GitHub is Gist. Gists are short code snippets you can save for reference. Gists can be in almost any language, and most languages have syntax highlighting support. You can have public Gists you can embed, or just have a private collection that you use for your work. This is very useful for keeping a library of reusable code that you may recycle regularly.
An example of a saved Gist:
Hosting your Websites on GitHub

What makes GitHub even more useful is the ability to host your projects for free, via their Pages feature. There are certain limitations to this. As there is no direct access to a server, the sites must be static web pages using HTML, CSS, and JavaScript. Nonetheless, this is enormously useful for quickly deploying static sites. You can use this for testing/staging purposes, or even as the final version of a site in some instances. The URL for the page will be http://yourGitHubusername.github.io/projectname/
To host an existing project using GitHub Pages, please follow these steps from the command line.
Make sure you are in the correct directory of the project on your local machine:
cd /path/to/repo
Create a new gh-pages branch, and then “check it out”. This creates an exact copy of the whole project, onto a new branch. Finally, the command below moves you over to the new copy.
git checkout -b gh-pages
Make sure you name the homepage of the project index.html and is in the root project directory.
The final step is to push your changes to GitHub:
git push origin gh-pages
And that’s it! You now have a static webpage hosted at http://yourGitHubusername.github.io/projectname/